Enable or disable align to grid for desktop icons in Windows XP
 You optionally have the ability to place desktop icons anywhere on the screen in Windows XP, so long as two settings are turned off: Auto Arrange will prevent you from placing icons outside the top left to bottom right order, or let you place empty spots between icons.
The second desktop settings is Align to Grid, the setting discussed in this tutorial. Although you cannot see it, Windows XP can keep track of the position of icons on your desktop thanks to a "grid", whose cells depend the dimension of icons. As shown on the screenshot, if Align to Grid is enabled, icons can be placed anywhere on screen (so long as Auto Arrange is turned off), and they will snap back in neat alignment on the screen.
Enable Align to Grid for desktop icons
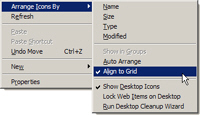 To check if Align to Grid is enabled, or to turn on Align to Grid, right-click in an empty area of your desktop to show the context menu: then click on Arrange Icons By, and a submenu will open.
Look at the Align to Grid menu item: if Windows XP displays a checkmark icon next to it, this means that Align to Grid is currently enabled, and guiding the alignment of files and shortcuts on your desktop.
If no checkmark is displayed next to Align to Grid, click on it: a checkmark will be added (and visible next time you look at the submenu), and Windows will immediately re-position the icons on your desktop to align to the invisible grid.
You can play with the Align to Grid feature by dragging and dropping icons around on the desktop - they will all fall back to place in the nearest "cell" of an invisible alignment grid.
Turn off or disable Align to Grid in Windows XP
 To disable or turn off the Align to Grid option for your desktop icons, right-click again on the desktop to reveal the context menu. Under Arrange Icons By, click on Align to Grid (which has a checkmark next to it if it is currently turned on).
You will not receive any visual feedback once you have turned off the Align to Grid option, but there are two ways to confirm that Align to Grid is currently disabled: drag around desktop icons, and see if they stay exactly where you dropped them - if they do, you will know that Align to Grid is disabled. (Another way is of course to see if a checkmark is displayed or not next to Align to Grid in the desktop's right-click menu, as discussed above.)