Show, hide, or move and resize the Reading Pane in Windows Live Mail ("Preview Pane")
Depending on your personal preferences and the screen resolution you are using, you will want to show or hide the Reading Pane ("Preview Pane") in Windows Live Mail, show it horizontally or vertically, and resize it to the perfect dimensions. This tutorial explains how to do all that, and how to preview these changes before you apply them.
Hide the Reading Pane, or show it (horizontal or vertical)
Follow these steps to configure the visibility and position of the Reading Pane:
- First, open Windows Live Mail if needed.
- Once you are in, click on the "Menu" button, or press Alt+M on your keyboard.

- Then, click on the "Layout" menu item.
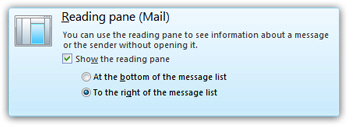
- Windows Live Mail will open a dialog that lets you configure several visual settings: click on "Reading Pane (Mail)", and you will see the following options:

- When the "Show the reading pane" checkbox is checked, Windows Live Mail will display a preview of the currently selected email either at the bottom or on the right of the main window. To hide the reading pane, uncheck that checkbox.
- If you want to preview the change immediately, no need to close the options dialog: just click on the "Apply" button (the change will appear in the background window).
- When the "Show the reading pane" checkbox is checked, you will see two other options below (which are hidden when you choose to hide the Reading Pane, since they are not relevant at that point). These settings determine the position of Windows Live Mail's Reading Pane.
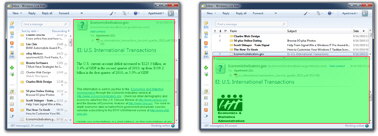
- To show the Reading Pane below the listing of email messages for the current folder, choose the "At the bottom of the message list" option. This is the traditional position for email programs, but modern monitors (wide screen displays) offer enough horizontal screen real estate to feasibly allow for the second option, which is to show the Reading Pane "To the right of the message list". The screenshot below shows you the vertical Reading Pane (left) and the horizontal Reading Pane (right).

- Click on "OK" to apply the new Reading Pane setting and return to Windows Live Mail.
Resize the Reading Pane in Windows Live Mail
To make the Reading Pane wider or narrower (vertical preview pane), place your cursor between it and your email listing, hold, and drag sideways. When you are using a horizontal Reading Pane, drag the border between your email messages and the top of the preview pane; both cases are shown on the screenshot below:
Note: the size and position of the Reading Pane are "persistent settings" - this means that they will be automatically remembered by Windows Live Mail after you close it, and be automatically re-applied the next time you open your favorite email program!