Set the default printer in Windows XP
 This free tutorial explains how to set the default printer on Windows XP: the default printer can either be a local printer (like a deskjet) or a network printer, shared by multiple XP workstations, or a print driver (like the Adobe PDF print driver).
Windows XP can send content to any of these types of printing outputs: in the case of an actual physical printer, Windows prints the output on paper; in the case of a print driver, Windows XP will pass the printable material to the print driver, which in turn will convert it appropriately (in the case of PDF, the plugin will output a printer-friendly PDF file).
Tip: learn how to Set the default printer on Windows Vista
Open the "Printers and Faxes" Control Panel in Windows XP
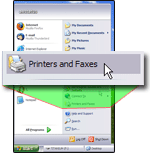
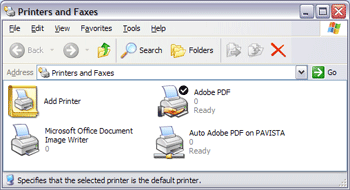
 The simplest way to set Windows XP's default printer is to go through the Start Menu: click on the Start button, and choose "Printers and Faxes" — this will open the "Printers and Faxes" window, which contains a list of all the printers and print drivers Windows XP recognizes on your computer; it will also show an "Add Printer" icon, which you would use to manually add a printer Windows XP has not detected (like a network printer or an old printer whose hardware has not been detected.)
 - Windows XP displaying a list of local printers, network printers, and print drivers -
![]() As you can see from the screenshot above, the default printer is currently set to the PDF print driver (this is Adobe's piece of software that allows you to print to a PDF file instead of printing the output on paper).
As you can see from the screenshot above, the default printer is currently set to the PDF print driver (this is Adobe's piece of software that allows you to print to a PDF file instead of printing the output on paper).
Choose your default printer for Windows XP
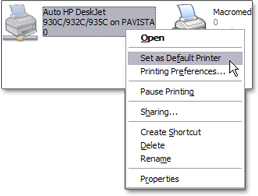
 To set another printer or print driver as the default, simply right-click on the icon corresponding to the printer you want as default.
On the context menu that opened, click "Set as Default Printer".
From now on, Windows XP will recognize as default printer the printer or print driver you just selected: whenever you try to print a document from an application, this will be the printer automatically pre-selected for you by Windows XP.
If "Set as Default Printer" is not visible in the context menu, you probably right-clicked on a printer already set as Windows' default printer.
Hitting Enter once the Print dialog is visible will send the print output to your default printer (no need to make sure that the printer you wanted was selected, unless you specifically want to print to an alternate printer).
Microsoft Office and the Default Printer
![]() Some application, like all the Microsoft Office programs (Word, Excel, PowerPoint, Outlook, etc.) have a special feature designed specifically to take advantage of Windows XP's default printer: it is called "Quick Print".
Some application, like all the Microsoft Office programs (Word, Excel, PowerPoint, Outlook, etc.) have a special feature designed specifically to take advantage of Windows XP's default printer: it is called "Quick Print".
On versions of Office before Office 2007 (like Office 2000/2002/2003), the Print button on the toolbar prints straight to the Windows default printer, without going through the Print dialog; to gain access to the options and settings available in the Print dialog, you simply print the longer way, by going to File > Print.
If you Print button does not bypass the Print dialog to send the output to your default printer, ask your system administrator or the next door teenager to customize the command on the toolbar to use Quick Print instead of the default Print command.
Printing Commands in Office 2007
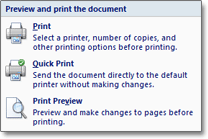
In office 2007, applications list the three printing options under the Office Menu, with each print command explained:
 • Print is the default print command, which displays the Print dialog (to let you select the number of pages to print, collation options, color vs. black & white, etc.);
• The Quick Print command we just discussed, which sends the document straight to the default printer;
• And the Print Preview command, which lets you preview the document on screen before it is printed.